Friday, October 30, 2015

Minor Build Project: Sticky Tiles!

This is another case of doing a quick/easy/inexpensive fix to tide us over until we have the time/money/energy to do a real update.  These peel-and-stick tiles are so awesome!  I've used them at my summer gig working for the Museum, so I knew they were great and trusted we could work with them and they'd look good.

We had this awful awful tile crap (the floor is lava!) at the front door.
...and those gray 12"x12" tiles are the new peel and stick jobbies.  NICE.  Mom said she had done something similar before, and recommended putting down Luan (aka Lauan) wood so that our new sticky tiles wouldn't sink down with wear into the cracks of these whack jobs.  So I did, with some liquid nails or some such product.  We let it dry for, well, a long time because we didn't get around to doing the sticky tiles right away.  But eventually we sticky-tiled on the Luan!  Much nicer.
We centered the row farthest from the door because we knew it would be the most visible.  So the remaining three edges had to be cut to size.  That was really the only difficult part.  We even left a secret message for whomever peels up these things in the future!
Taadaa!
Much better.

We liked these so much and they looked so good (and matched our carpet and walls so well!) that we quickly decided to do the fireplace, too.  The red fireplace tiles didn't really bother me, but I definitely like the gray sticky tiles better.

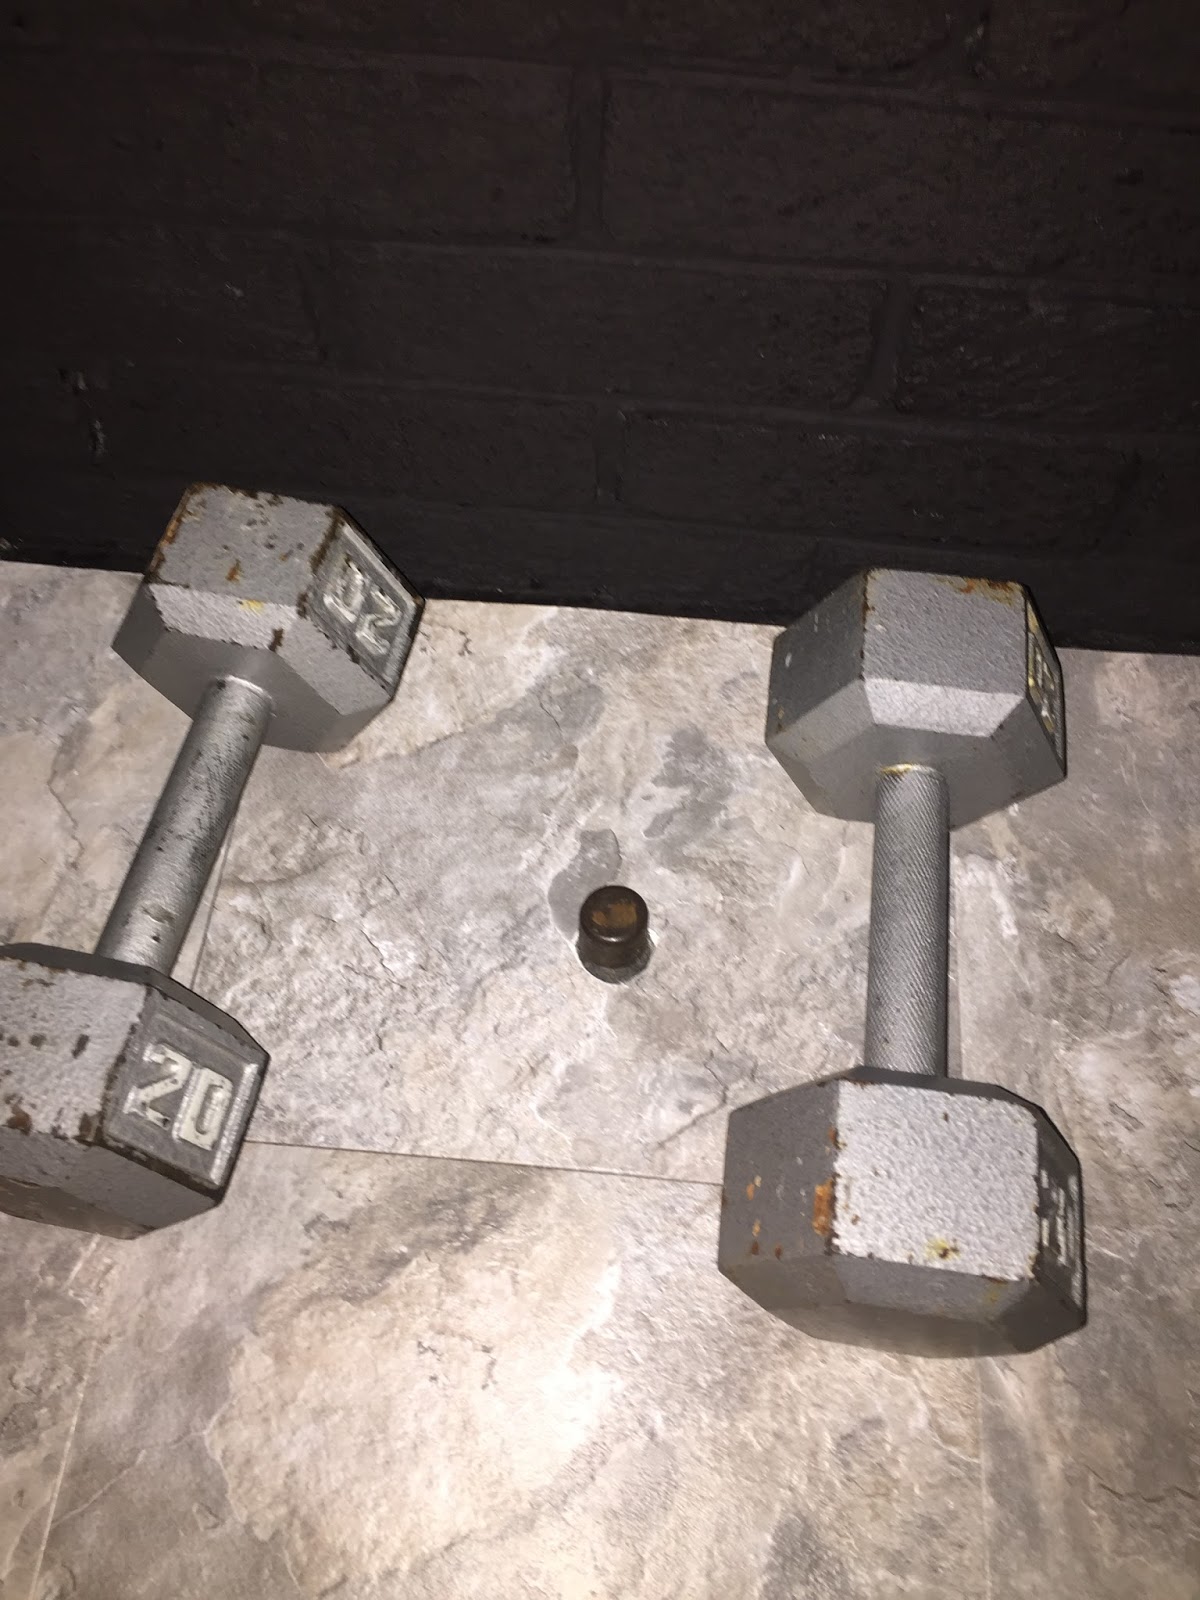
The fireplace was a little bit different.  We didn't use Luan since there would be no real traffic stepping on the hearth area, and because the existing tiles were much flatter.  This meant the surface under the sticky tiles was less porous and they didn't stick quite as readily.  So, I grabbed a scrap of Luan to distribute the weight and slapped some dumbbells on it.  Teach those tiles who's boss!

The other really tricky part was tiling around that gas line outlet.  It's capped off, so it doesn't work, but it was still in the way.  So I carefully cut a hole in the center of a tile.  It was a masterful job.

So, painted up real nice with new tiles and the bookcases back in place, the fireplace is done!
~S

Thursday, October 29, 2015

Minor Build Project: Linen Closet

The pretty curtain in my office hides a small closet, and the bulkhead for the steps eats up the bottom of it.  So it's not much use as a clothes closet, but it's perfect for a linen closet (especially since there isn't one elsewhere).  All it needed was some shelves!

I tell you what, these walls in these old houses are hard as rocks.  This took ages to do because my drill kept dying and I had to go get wall anchors and all kinds of shenanigans.  But I persevered!  John helped me level and hang them.

Nice, huh?  Instant linen storage.  I was even smart and made sure to leave enough height on the bottom shelf / bulkhead for a storage tub.
~S

Wednesday, October 28, 2015

Major Fireplace Overhaul

This has got to be one of the most visually powerful updates of all.  I am in LOVE with my new fireplace!

I knew that the existing fireplace was not what I wanted.  It was dark, dreary, and made the room feel like a dungeon.  Gross.  This is what I was starting with:

So I shopped for DIY updates on pinterest, of course.  I found several I really liked, and collected them on this pinboard: Fireplace Makeovers

The trick, in my case, was working with something that would freshen everything up, brighten the room, AND keep my beautiful wood mantel unpainted.  It's a nice wood mantel, and it helps to tie in the wood banister at the steps.  I love this banister, and even though I'd like to modernize it by painting it white, too, I can't bring myself to cover the wood.  So, to keep the wood mantel while updating the look was my mission.


I googled how to paint fireplaces, and found out you basically clean it and slap some paint on.  Easy peasy.  I got special, heat-tolerant black paint for the firebox.  The fireplace isn't currently operational, but there seems to be a gas line in place, so it could be in the future.  I wanted to make sure I didn't regret not getting the right paint.

Here are my gathered supplies.  After I was a dummie about cleaning the bathroom fixtures and since this was brick, I knew I was going to have to spend a lot of time cleaning.  I used white vinegar and water at 50/50 in a large bowl and scrubbed with a brush.  Then it took a surprisingly long time to dry.

You can see here I used a lot of drop cloths.  This is important!!  While I was cleaning, the brush flung drips of disgusting black brick goo water all over everything.  I'd just had the carpets cleaned, so protecting them was a high priority.  I was glad I'd been so careful because those bricks were DIRTY.

After everything was mostly dry, I taped off the walls and floor and under the mantel.  In some of the fireplace pictures you can see we have custom bookshelves at each side; I removed them from the fireplace in order to paint it properly.  You can see we were good and even moved them to paint the walls behind them brown :)

I painted the firebox black first after carefully considering how much of the edge I wanted to be black.  From my Etsy board, I saw people who had the black wrapping around to the edges of the trim bricks, and I saw some who had gone along the edge of the face of bricks... I decided to go with the latter option because I thought that painting the trim bricks black would make it harder to create a straight line between the black and white.

Well.
It's beautiful.
It's very modern and looks so good with the white upper buildout.  The whole room is brighter and feels more updated because of it.  And I was so glad to see the hideous, dark brick gone!

Here's another angle where you can see the colors better:
Love it.
You almost can't tell here, but the window trim next to the fireplace is off-white.  So, this is part of the trim-painting project I mentioned in an earlier post: that needs to be white to complete the look!  We currently have white sheers on those windows, so you can't tell the trim is off-white, but I know it.
~S

Tuesday, October 27, 2015

Bathroom Fixture Update

One of the things I did in the week between painting walls and moving in was to update the bathroom fixtures.  The vanity cabinet is one of those neat old one-piece jobs that sits between studs, which I love, and I have no idea how to swap out lights (though I imagine in the next year or two I'll learn).  These were all a horrible dark brassy color.

The best advice we got when we bought the house was to do a quick fix until we have enough time or money or both to do a proper replacement or repair, so I decided to paint these babies.  I HATED the brass/bronze finish.  It's really a shame that the towel bars are that color, too... I will have to wait on those since I didn't want to fool with painting them.  Luckily they are largely covered by towels.

Since spray paint was the best choice for these things, first I taped off the whole area I didn't want to paint.

 Here's the paint I used:
...and I was a complete IDIOT and didn't even wipe these things down before going at it, let alone lightly sanding or anything.  I highly recommend you don't get too eager and skip these steps.  I have some unfortunate textures and some drips because I didn't prep properly.  Good thing this was a quick fix and not a permanent job!

Next, I did three light coats, letting them each dry at least 12 hours between coats.

Before:

VOILA! After!

My dad also added a towel ring and we replaced the over-toilet organizer you can see in the reflection with a hanging one.  So, the final results are crisp and clean.
The last thing we will someday manage to do in the bathroom is take care of this dark, hulking monster:
Everything else is so modern and white, this thing is a complete eyesore.  I'm going to paint it near-white when I do the kitchen (more on that later) and already have updated nickel hardware to put on.  Someday!
~S

Monday, October 26, 2015

House Updating--Painted Rooms, cont'd

Here are the rest of our beautiful, freshly-painted rooms, before and after.

Dining Room: Gray--and check out those swanky parquet floors!


(Barb and Joe left us these beautiful cabinets and the dry sink in exchange for not working on any of our requests from the inspector.  We are completely happy with this deal!)

Hall: Brown (and Interesting Aqua at steps)


Bedroom 1 (Bedroom): Brown
Bedroom 2 (John's Office, Guest Room): Gray

Tiny Room (My Office): Gray with one unpainted (beige) wall--I decided to leave the entry wall beige in my tiny office because 1, there is this really good-looking curtain covering a closet and it matches *perfectly* and 2, it would have been almost entirely cutting in, so it would have taken forever.  Plus it wasn't the weird creamy yellow that was all over the downstairs, so I didn't hate it.  It looks awesome with my gray.
Here's the curtain.  Admire how PERFECTLY it matches.
And the view of the room from the door:


And, finally, the bathroom, which Susan and Mom painted white.  The peach was complete garbage.  Now I have these peach blinds I can't get rid of, even for free!  Haha.

So, what's left to paint?
Trim.  Lots of trim.  Which is why it isn't done yet; it will take forever and I'm kind of dreading it.  The trim in my tiny office will be white, and the trim in the living room and dining room needs to be painted white as well.  The trim in both bedrooms is wood or already white, so it's good to go. 
~S

House Updating--Weekend 1: Paint

OK! Get ready for some updating.  Here is the first of many house posts.

We closed on Sept 4, the Friday before Labor Day, on purpose.  It gave us a three-day weekend with Mom and Dad and Susan to work on the house before we moved in.  The plan was to get as much done that weekend as possible, and for me to work on the house during the week, and then to move everything in the following Saturday, the 12th.  The only failures of the plan were that I didn't get a whole lot done during the week owing to how stressed I was, and that it rained on moving day.  Otherwise, it was really smart to do things before moving in furniture, etc.  It meant asking the landlady in Westover for a half month of rent, which not everyone can do, but for us it was perfect.  Ok I realize I briefly mentioned this scheme in my first post, so moving on:


Painting weekend!  It was great having Mom, Dad, and Sus at the new house!  They Ooh-ed and Aaah-ed appropriately, and we painted every. single. room.  Our original palette was a little ambitious, and we realized that the yellow color John picked out for his office was almost indistinguishable from the existing yellowy cream we both disliked, so we dropped that.  We may add the darker color (Mink) back in as a feature color at some point, since we both love it, but for now we just wanted to get the base colors updated.  So the whole house ended up brown and gray, with a large feature wall in light teal.  The dark deal is eventually for the front door.

[top to bottom: Sherwin Williams Nomadic Desert, SW Mink, SW Interesting Aqua, SW Gray Screen, (yellow eliminated), and HGTV SW Mermaid's Tale]

The most dramatic transformation was the wood panel wall at the stairs. 
 (check out this handsome guy)
BEFORE
...
AFTER!
Flippin' gorgeous. I am absolutely in love with this color (Interesting Aqua).


Ok, so in order to paint paneling, you have to first give it a good rubdown with mineral spirits.  It got us all high for a while.  Here's John doing the Tiny Room. 


You can also see we did the living room brown.  Here are more befores:

...
....And after! OK, it's hard to see that one in photos because of the light.  But trust me, it went from semigloss (EW) yellowy-beige (EW EW) to what I call chocolate milk brown (SW Nomadic Desert).  We painted the buildout above the mantel white for contrast because I had a vision.  More on that later.

You can also see the awful, awful curtains in the before pictures.  Honestly, just taking them down made John and me both see the house in a whole new light (no pun intended, but dang that was a good one).  Removing the layers and layers of frou frou brought the house up to the twenty-first century and the paint did the rest.  Each window had the full treatment: a shade or blinds, sheer curtains, full curtains, and a valence.  It's a small fortune in window dressings.  We hardly rehung anything.

It was a long weekend!  Here's Mom, eating lunch on a ladder and painting.  So typical.
And the dogs, who were not into it at all and just retreated to the softest spot they could find.

Ok, this post is long and photo-heavy, so I'm going to split up the rest!
~S

Backtracking to "Before"

So, I am ready to start blogging about all the updating we've done to the little Creampuff house (that's seriously what the selling agent called it, no lie).  BUT FIRST, before photos!  Natch.

For the most drama, I've snagged the listing photos from online.  I'll post empty before photos with individual updates.  You can see the house needed some cosmetic updating, for real.


Ok, so there you have it.  What we saw when we decided to buy this place.  Barb and Joe, the previous owners, are in their 80s and wanted to move to a single-story.  They took really good care of this place, but boy, it looked like a coupla octogenarians lived here. 
~S